At first, I had planned on designing the lunchbox out of the actual Eco Emi shipping box (I've made plenty of crafts out of those boxes, including the DIY for last month) by lining it with metallic duck tape and decorating the the outside of it with the paper, more duck tape and contact paper to protect it from the elements. Lucky for me, though, I still had the metal box from the February 2013 Eco Emi to really take the lunchbox idea to another level. Here's how I made it, using some leftover ribbon from a past project for handles, a hammer and nail to poke holes in the metal and some crafty brads to hold it all together.
To start, I decided how I'd lay out the ribbon handles and marked the eight spots where the holes would go for the brads to anchor the ribbon in place. Four of the holes were marked on the lid, and the other four on the base.
Then, I used a hammer and nail to make the holes on the lid.
I repeated the process on the base, as seen in the photo above.
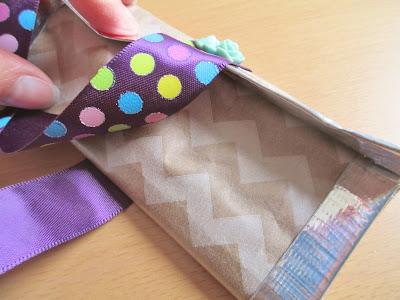
Leaving more than enough ribbon to form a handle at the top of the lid, I attached the ribbon to the lid with a mint green floral brad (although you could use any other strong brad or small screw/nut combo to do this). This is how it looks from the outside ...
... and here is what it looks like from the back, once the brad is secured.
I covered the back of the brad with a piece of duck tape, just to be safe.
Next, I stretched the ribbon across the inside of the lid and secured it with this button brad, as shown.
Moving on to the back of the box, I used brads that look like screws (a screw/nut combo could also be used) to attach more of the ribbon, as you can see in the above pic. I made sure to leave a loop of ribbon at the top for a handle.
I kept the ribbon path flowing across the other half of the lid, attaching it with more brads and duck tape. I also formed the other ribbon loop handle at the top of the lid, which I secured with the first brad and more duck tape.
Here's how the box looked with the ribbon handles fully attached. The lunchbox could be left as is at this point, but I decided to fill in the clear window with some of the tissue paper, the zig-zagged paper bag and the rectangle card stock coupon from this month's Eco Emi.
After carefully deconstructing the paper bag, I cut off a rectangular section of it, using the original fold as a guide.
Then, I taped on some of the tissue paper and the backside of the coupon card, which I personalized with an "H" for Hayden.
I placed my design inside the lid's window, so it could be seen clearly.
I used duck tape to attach it and to cover the back of the paper, protecting it from whatever gets put inside the finished lunchbox.
To match the lunchbox, I used the remaining piece of paper bag and tissue paper to create a coordinating design for a roll-up utensil holder/carrier.
I decided to cover it in contact paper, so the finished product could be easily wiped clean, as needed.
Then, I trimmed off the excess contact paper.
I wrapped metallic duck tape around the edges and folded it to form a pocket.
I added more duck tape strips to act as pocket dividers, just the right size to hold the tiny utensils.
Since I wanted to roll up the utensil holder, I also needed some of the matching ribbon to tie the roll shut. I used a brad to attach the ribbon, near the end of the roll.
Then, I rolled up the utensil holder to determine where I should place the other brad.
This is how the utensil holder looks unrolled with both brads securing the ribbon in place.
Here is how it looks from the inside ...
... and this is the finished utensil holder when rolled and tied shut.
See how perfectly it fits in Hayden's new lunchbox ...
... and her having fun showing it off for you.
Happy Monday!


