Things have been busy around here, but we always find time for Eco Emi. Our November box arrived yesterday, not long before I had to run out the door to pick up my son, etc. The holidays are in full swing, which explains why I accidentally referred to this month's Eco Emi box as the last one of the year (duh, December 1 is tomorrow; it's still November today). Oops :-)
Anyhoo, Hayden and I had considered not doing an unboxing video this month, but since we hadn't mentioned that thought on the blog yet, we quickly found a moment to catch our initial reactions on camera (we always do our videos as soon as possible, because we just can't wait to see what's inside the box). Unfortunately, the lighting in this month's videowas awful (the way the sun and shadows were hitting my face made me look sickly, although Hayden seemed to glow like a little angel). Luckily, my pictures and views of the products below provide a clearer view.
Candy Mint Foot Stick by Deep Steep: We've sampled a Deep Steep lotion in a past Eco Emi box, so we already were fans of the brand. Hayden and I were excited to see another large tube, similar to that amazing Organic Indulgence body butter stick we received over the summer, especially since in looked like a cute candy cane. It smells delicious, too; reminds me of those smooth and melty mints I used to eat as a child. I'm just a little concerned about applying it directly onto my feet. Maybe I'll put some on my hands to apply it.
Vegan Orange, Clove and Cinnamon Soap by Metropolis Soap Co.: I think I've seen other bloggers post about this soap with rave reviews, but Hayden and I had yet to try it, until now. It smells exactly like orange, clove and cinnamon; so festive! Hayden already claimed this one for herself.
Twilight Sparkle & Smokey Quartz Eye Shadow by Lauren Brooke Cosmetiques: I have to thank Christine (founder of Eco Emi) for introducing me to this brand of cosmetics. Every product I've received so far, I've loved and would recommend to a friend. This month's eye shadow colors work wonderfully together to create a sparkling gray smoky eye for the holidays.
i Sparkle Eye Cream by i choose to glow skincare: Okay, so I'm not shy about admitting my age, but I don't always want to look it. I gotta have my eye cream. This one's adorable pink logo sparked both mine and Hayden's attention. I tested it out this morning, and I do think I look more awake and sparkly. It must be that subtle bit of pixie dust added to the mix (I'll never grow up). It seems to do the trick without being very obvious or settling into my fine lines (yes, I have a few when I smile).
Pumpkin Face Mask by Rainwater Botanicals: Who doesn't love pumpkin, especially this time of year? I haven't tested this particular facial mask yet, but I can tell you that using just cooked pumpkin puree as a mask has worked to give me a healthy glow. Something tells me that this might be even more luxurious, though
Blueberry Greek Yogurt Bars by Athena Bars:Obviously, this one is not vegan, but I think my mom would like this one. She's into the Greek yogurt and blueberry craze. I can see why Christine included it in this box.
Seaweed Powder Bath with Hawaiian Kukui Oil in Citrus Scent by The Seaweed Bath Co.:The Seaweed Bath Co.is one of the brands I've continued to purchase after using up my Eco Emi samples. I highly recommend the shampoos and conditioners, which happened to be sold at a store near my friend's house. I can't wait to use this powder bath. I might have to reserve a spa day this weekend and use that Rainwater Botanicals Pumpkin Mask then, too.
Well, that may have been my last Eco Emi video, although I still plan on posting what is in future boxes and the follow-up DIYs. It's just not always convenient to get our initial reactions on camera and get the video posted in a timely fashion. More and more YouTubers are posting their videos, and the competition is fierce to be the first one posted.
Speaking of DIYs, I made a pair of earrings the other day to match the necklace DIY from my last post. I used the same technique, but smaller.
Can anybody hear me? Ha ha. Sometimes I think I've lost all my readers when I take a long break like this last one (my last post was on November 7). Thank you to everyone still reading today.
Things tend to get busy this time of year, and I've opted to enjoy every minute of it. I had a lovely Thanksgiving with my family, celebrating brunch with at my parents' house and then dinner at Matthew's uncle's house (I was craving some warm food, so I brought roasted vegetables, a creamy quinoa/rice and fall veggie dish, and Chocolate-Covered Katie's No-Bake Chocolate Pumpkin Pie. I also enjoyed the green beans and a baked sweet potato. Yum!).
Yesterday, I was crazy enough to go Black Friday shopping with my mom and one of my sisters (the other one had plans). It's been our tradition for years. It's mainly a fun excuse to go out together, get some of our holiday shopping done (although I tend to complete most of mine before then) and take advantage of the deals at the local craft store (supplies are needed for various projects at church, and we tend to be crafty in general).
So, taking advantage of the 30 percent off everything discount at the craft store, I picked up all I needed to make my DIY version of the By Boe Drop Diamond Necklace. I purchased some 24-gauge and 16-gauge gold wire (I love using different wire thicknesses for wire-wrapping jewelry), a small string of beads that looked identical to those on the original necklace (I only needed 7 beads, so I have a lot left over for other projects) and two 18-inch pieces of gold-plated chain (one for each side of the necklace). I also had a gold clasp at home to complete the needed supplies.
To start, I strung 7 beads onto the 24-gauge wire (it's the thinner of the two wires).
Next, I used my jewelry-cutting tool (I highly recommend buying a 3-in-1 jewelry-making tool and/or a set of tools for making jewelry) to cut a piece of the 16-gauge wire (the thicker wire) and formed a v-shape out of it, similar to the one on the original necklace.
Then, I bent the ends around the wire with the beads, cut off the excess and attached it by creating loops, using my jewelry-making tool with the rounded tips.
I attached the chains with the ends of the 24-gauge wire (the smaller wire, which I looped through the chain and the finished ends of the thicker wire).
After attaching both chains, I decided to shorten them to be the exact length as the original necklace (13-inches on each side). I measured each one ...
... and then cut them to the desired length.
The necklace is long enough to fit over the wearer's head, if the chains are attached together with just a jump ring, but since I had a clasp on hand, I attached it to the finished necklace.
I can't believe how much it looks like the original. I wonder if my sister Lori would like one for Christmas. The two of us have planned to make each other presents this year. She sometimes reads my blog, so I'll probably go with something a little different.
Is anyone else making gifts for their friends and family?
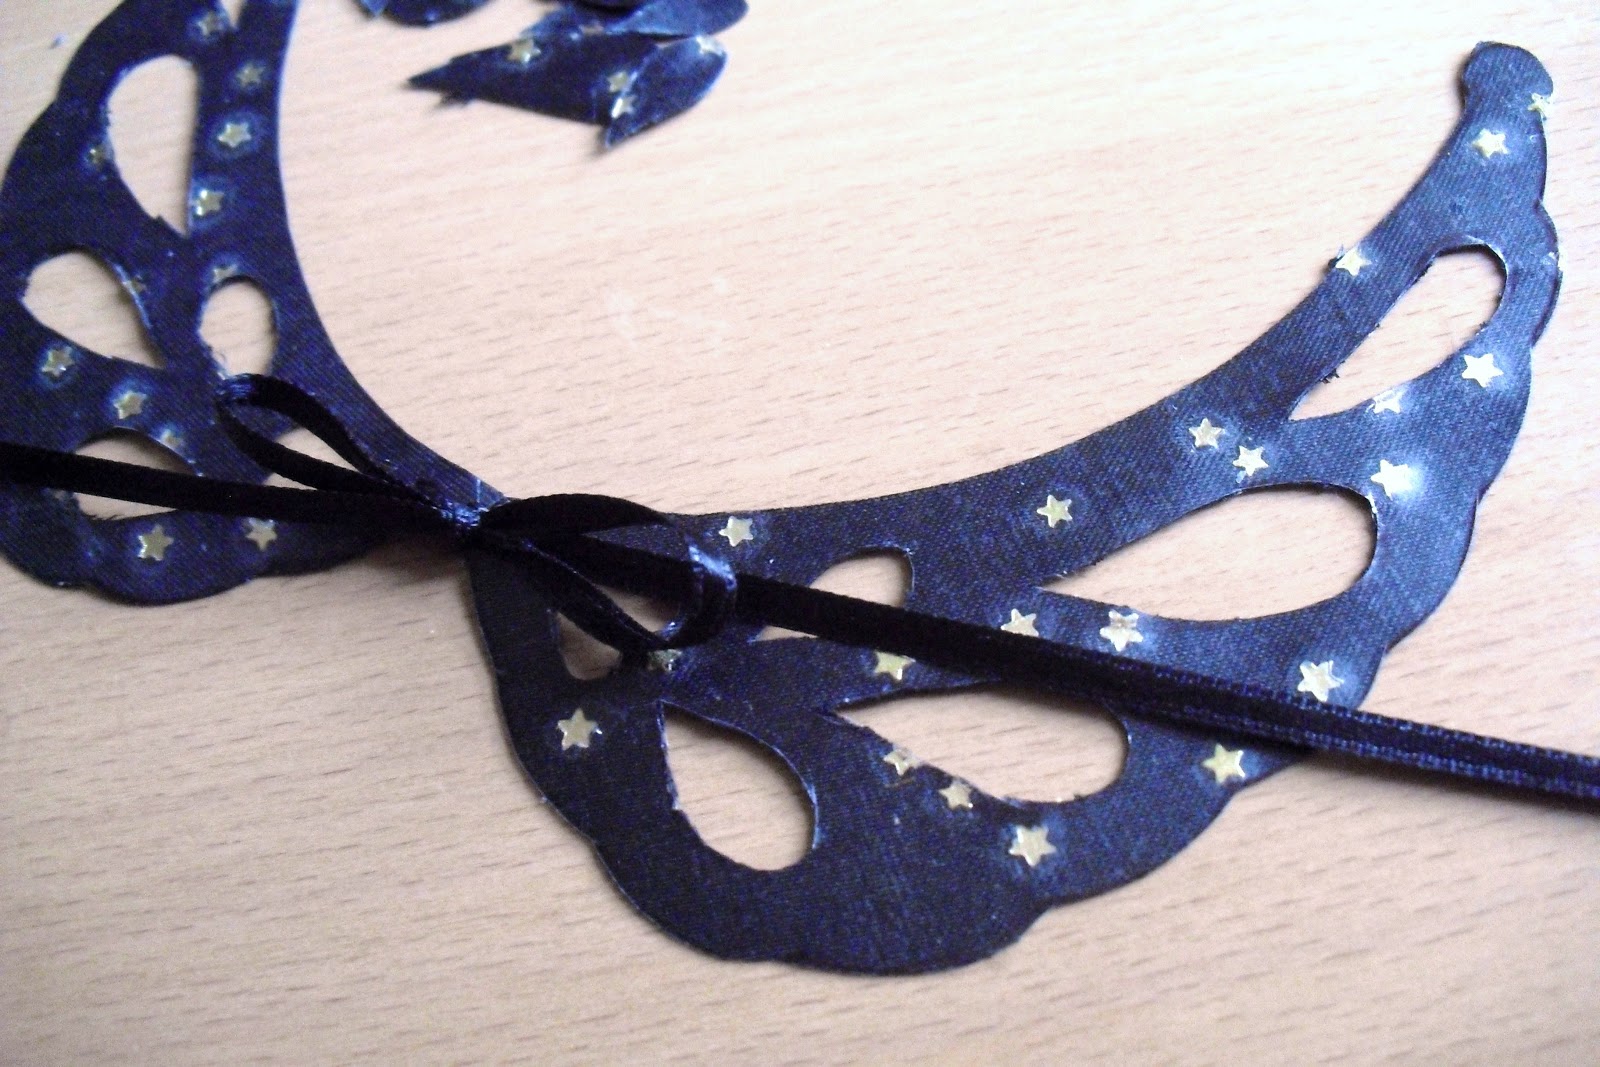
Since Halloween is over (and I don't have another reason to wear an Urban Lace mask), I decided to create a necklace, using the same technique. Then, I remembered my Peter Pan collar necklace and was inspired to make a mock Urban Lace version of it.
To start, I gathered my supplies: the silky black pouch and leftover glitter stars from my October Eco Emi box, a pair of scissors, some clear contact paper and a couple jump rings for jewelry making.
Next, I ripped the seams out of the silky black pouch and removed the black ribbons.
Then, I sprinkled some gold glitter stars on top of the fabric and placed a small rectangle piece of clear contact paper on top to hold them in place/laminate the fabric to look like the Urban Lace designs, which are made out of recycled bicycle inner tubes. I also attached a piece of contact paper to the other side of the fabric to reduce fraying.
I used my Peter Pan collar necklace as a guide, tracing one side of the collar onto the contact paper-covered fabric.
I cut out the first collar piece, and then, repeated the process with the other collar piece.
After I cut out both pieces, I drew alace-like pattern onto each one, similar to the Urban Lace designs.
Then, I carefully cut out the lace pattern, removing the teardrop shapes from both of the collars.
Next, I attached two collars together in the center by poking a small hole through the inside point of each collar. I had planned on attaching them with a jump ring, but opted instead to link them with a thin black ribbon from my sewing box. The center bow was a nice touch.
To finish the necklace, I added the ribbons from the silky black pouch to the outside corners of the collar. I poked a small hole in each corner, attached a jump ring and tied the end of the ribbon to the jump ring. A simple bow tied around my neck was all that was needed to keep the necklace in place. The result was exactly what I imagined, perfect for the young at heart :-)
If you read my last post, you already know that October's Eco Emi box has a Halloween theme. It's decorated with black and orange paper, tiny sparkling stars and moons, black cat and witch confetti, and orange paper "straw." Not only does it scream Halloween, but it also has me thinking about scarecrows.
For this month's first DIY (I did two this time; in case you missed my other Eco Emi DIYs, here's January, February, March, April, May, June, July, August,my first September Eco Emi DIY and my second September Eco Emi DIY), I decided to transform one of Hayden's photos into a cute little scarecrow, although who could be scared of her adorable face(except maybe the kittens at my inlaws' house; she's playing with one of them in a box in the photo above)?Maybe that's why I ended up making her look more like a ragdoll than a traditional scarecrow.
Anyway, here's how I made this fall-inspired photo frame out of my October Eco Emi box (yes, I really did use the box) and the decorations inside (tissue paper, confetti and paper "straw"). Feel free to make your own as either a scarecrow or a ragdoll (I used a large gingerbread man cookie cutter as a pattern).
To start, I cut the Eco Emi shipping box into two rectangles and traced the body shape onto one of them.
Then, I cut out the body shape, traced it onto the other rectangle and cut it out.
Now, what's a photo frame without a photo? I selected one with the perfect size face for this project (and that I wasn't fond of the rest of the photo; Hayden looks cute in it, but I didn't need to preserve the shot of my backside).
I cut out Hayden's face from the photo and glued it to one of the cardboard cutouts.
Then, I drew a circle on the other cardboard body shape, cut it out and glued it on top. You can see Hayden's face through the hole.
I started the decorating process by drawing on the shoes, coloring in the hands ...
... and gluing on a tissue paper "shirt."
Then, I decorated the rest of the figure with more tissue paper (I had to give her a tissue paper skirt) and confetti, making sure to glue the one piece of cat confetti to the center of the shirt (Hayden was really excited to find it in our box). I even braided the paper "straw" and glued it onlike hair.
To make the frame stand up, I used a strip of cardboard from the box and bent it into the desired shape.
Then, I attached it to the back of the figure with glue and tape.
Now, my little lady is standing tall. Isn't she a doll?
In my next post, I'll show youanother Eco Emi DIY, using more items from the October box. It's a fun fashion accessory, inspired by a character that never grows up ;-)