Sorry I've taken so long to post my second of two Eco Emi DIYs I planned to post this month. The first was a personal pinata perfect for your next summer celebration, although I haven't felt much like celebrating. While many Americans were busy hanging out at their traditional Memorial Day cookouts, my family spent the day in mourning. I nearly didn't post this DIY, until a memory of my hubby's late uncle (he passed away suddenly Monday) brought a smile back to my face. You see, he was quite the comedian, always having fun with my willingness to believe whatever he said. For example, he purchased my first Vera Bradley bag and many more after that one (he would usually give one to me for Christmas and my birthday). When an official Vera Bradley store opened nearby, he tried to convince me that he met "Vera Bradley" herself. I, of course, believed him, until I my "Googling" skills revealed she didn't actually exist. I still laugh about his little trick every time I see a Vera Bradley bag or print.
So, I reconsidered posting today's DIY when the Vera-like print just seemed like a sign for me go through with it as planned, as well as to share his memory with you. Here's how to make a coin purse/ID holder, using the printed fabric and clear plastic case from this month's Eco Emi, as well as a small zipper, thread and scrap ribbon.
First of all, I must apologize in advance for doing this project "on-the-fly," without any measurements. I basically followed Tim Gunn's advice; in other words, "make it work." For example, my zipper was slightly too long for this project, so I did some wrap stitches at the point I wanted the zipper to stop and cut it to the desired length.
Then, I folded the material in half and marked where I planned to cut the fabric, using my Vera Bradley coin purse as a guide.
After I cut off the excess fabric, I also cut a rectangle out of the plastic case to serve as my ID window. I also reserved the excess piece of fabric to create the pocket behind the window.
I traced my ID onto the inside of the larger piece of fabric where I wanted the window to be. Then, I cut out the inside of the window, leaving a tiny border to frame my ID or other card when placed inside the finished pocket.
Next, I positioned the clear plastic on top of the window and the scrap piece of fabric on top of the plastic, making sure the festive fabric print was showing through the window. Then, I sewed the rectangular pocket together (be careful not to sew the top of the scrap piece, so that you are left with a pocket to slip your ID inside; the best way to do this is to position the top of the scrap fabric slightly lower than the top of the plastic).
Once I created the pocket, I opted to sew on the zipper, starting with the pocket side.
The second side of the zipper was a bit trickier, as I was working with such a small piece of fabric that I had folded in half (rather than cutting two separate pieces for the sides that would be sewn together in the end). I unzipped the zipper and got creative with my sewing machine. I was able to sew most of the length that way ...
... but finished the last stitches by hand.
Before sewing the sides together, I decided to cut a piece of ribbon to transform the coin purse into a wristlet.
I made sure the zipper was unzipped and the fabric was inside out, pinned the ribbon loop in place (it should be inside the unfinished inside-out coin purse at this point) and sewed the sides, as shown.
Then, I flipped the coin purse right-side-out through the unzipped zipper.
I added a small piece of ribbon to the end of the zipper for that extra special finishing touch.
And since I'd prefer not to display it with my actual ID, I slipped this Lauren Brooke offer inside the window. I hope it's okay that I shared this with you. There are always cool offers inside each month's Eco Emi box, much like this one. It's worth checking out (and no, I was not paid to say that).
As usual, today's post is a follow-up DIY (in case you missed it, here's last month's DIY) to our May Eco Emi unboxing. I actually have two projects planned for this month, but decided to divide them into separate posts. The first made it rain blueberries for Hayden.
Rain blueberries? Okay, so maybe it wasn't actually raining (although it did rain outside yesterday). It was just Hayden's reaction to the blueberries falling out of her personal pinata. I wish I could have gotten a clear picture of the berries "raining" down on her, but unfortunately, my camera isn't fast enough to capture them in motion (Hayden, on the other hand, captured her berries quite quickly, gobbling them up with glee).
Luckily, you can recreate the experience using fresh blueberries, another healthy treat or other fun pinata fillings (small toys, stickers, erasers, etc. are good ideas). All you need is a paper towel or toilet paper tube (cut the tube down to size, if using a paper towel roll tube), the festive packing material from this month's Eco Emi box (colorful tissue paper and crinkled paper shreds), scrap ribbon (I like to use leftover ribbon from other projects or the ribbon meant to hold items of clothing on a hanger; those ribbon loops always seem to slip out of place, so I tend to snip them out of my tops, dresses, etc.) and some tape.
The first step is to cut a small square of tissue paper to fit the bottom of the tube. You'll also want to cut a tiny slit in the center of the tissue paper square (you'll see why in the next step).
Then, take a few of the crinkled paper shreds (or a piece of ribbon/string), stick the end(s) through the slit in the tissue paper square and tape them in place on the other side. This will be your pull-string for emptying the contents out of your finished pinata.
Next, attach the tissue paper square to the bottom of the tube with some tape, making sure the pull-string is facing out.
On the other end of your tube, poke a hole on either side of the rim, thread through your ribbon and tie a loop for hanging your pinata.
Now, it's time to decorate your personal pinata. It's really all up to you, but this is how we decorated ours, using the items from this month's Eco Emi box. Simply cut a strip of colorful tissue paper and make some fringe.
Tape (or glue) the tissue paper fringe around the base of your pinata tube.
Then, I added a layer of bright pink crinkled paper shreds. I folded each shred in half before attaching it to the tube.
The next layer I added was another strip of orange tissue paper fringe. Then, I attached some neon green crinkled paper shreds ...
... followed by yet another strip of orange tissue paper fringe.
Lastly, fill your finished personal pinata with berries (or whatever else you want. I recommend filling it right before you use it), hang it up, pull the string and watch the contents fall out of it. The best part is that you can re-use the pinata tube. Just add a new tissue paper square with pull-string to the base before you refill it.
Today's DIY was inspired by my brother-in-law's wife Karen, who is hosting a graduation party soon (congrats to Lauren for completing her bachelor's degree). She mentioned that she'd like to make a bunch of personal pinatas for the occasion. It reminded me of when I'd make them as a kid. I just know the kids and kids at heart in attendance will really love this idea. Thanks Karen for reminding me about these.
Speaking of graduation, Hayden completed her first of year of preschool and received a special certificate at her school's beach picnic the other day. She still has another year of preschool, but we were all very proud of her.
Hayden also had dance pictures this week. I can't believe her first dance recital is right around the corner. Here she is checking out her hair, makeup and costume in the mirror.
Jacob is also busy with end-of-the-year activities. We all went to his school's mini Relay 4 Life the other day (Hayden displayed her unique sense of fashion, insisting on wearing mismatched winter gloves). He also had his field day scheduled for yesterday, but it was postponed due to the rain. That means he still has something fun to look forward to next week.
Hope everyone is enjoying their holiday weekend. Have fun!
The temps are heating up and the humidity is increasing. It definitely feels like summer around here, especially yesterday, when my latest Eco Emi arrived in the mail. The summer-themed box was one of the best I've received so far.
As usual, Hayden and I made our unboxing video, right before heading out for her dance class. She has dance pictures today and a crazy recital week (rehearsals and two performances) coming up soon. Anyway, in case you missed it, here's what we got in this month's box:
Assorted Nail Polish by Suncoat Girl: Hayden and I are definitely girlie girls, who enjoy a pretty mani-pedi every once and a while. We love the fact that this kid-friendly nail polish is water-based and odor-free. We received a pale orange color (Delicious Peach), perfect for summer and my warm skin tone (it looks like a soft nude shimmer on my nails). It glides on evenly and is easy to apply. I just wished it dried a bit faster on Hayden's nails (she's a bit impatient sometimes). However, it's so simple to remove; just soak your nails in warm water and peelaway the polish (seriously, it works; Hayden and I tried it).
Vegan Assorted Natural Mascara by Suncoat: I'm so happy this mascara came in this month's box. Mascara is probably my "desert island" makeup product. You can barely see my lashes without it. However, this particular mascara has Hayden's name written on it this time (although I may have to purchase one of my own). It is natural, sugar-based, vegan and "kind to sensitive eyes." I finally have a mascara I can use on Hayden for her dance pictures tonight, as well as her recital (makeup is required, including black mascara). Although this mascara is not waterproof (no tears baby girl), it should resist smudging.
Mongo Kiss Honey Vanilla Lip Balm by Eco Lips: In our video, I failed to mention that this lip balm is made by Eco Lips. It amazes me how many varieties of lip balms they make, especially since I seem to love them all. This one is no exception. It smells lovely and is a nice chunky size for little hands to grip (Hayden is a big fan of natural lip balms). It's cruelty-free, GMO-free, gluten-free, USDA organic, fair trade certified, manufactured with 100% renewable energy, and thetubes and caps are madeout of recycled materials.
Pink Champagne Powder Eyeshadow by Lauren Brooke Cosmetiques: Now you know I'm a big fan of all the Lauren Brooke Cosmetiques I have received in past Eco Emi boxes. This pink champagne color gives a rosy glow for summer and is just right for daytime wear. The best part is that it doesn't irritate my sensitive eyes. Hayden even tested it out. Oh, and did I mention it came in a full-size container?
AquaSport SPF 30 Sunscreen by All Terrain: In the summer, I gotta have my sunscreen. This one looks like it can handle a day at the beach or even the pool. It claims to be non-greasy, both water and sweat resistant, and the best part, won't cause eye sting. Hallelujah! ("Hallelujah, I Love Her So" just happens to be Hayden's dance recital song, if you were wondering). I can't wait to try it at Hayden's end-of-the-year preschool picnic this week.
Pomegranate Bars by Athena Bars: This is the third Athena bar to come in an Eco Emi box (the other two were blueberry and pumpkin spice). Each bar contains two servings of fruits and veggies, 40 antioxidants, 10 grams of protein and also probiotics. Since I opt for vegan or "bee-gan" bars, I haven't sampled these for myself, but I hear they are really good.
Assorted Lotion and Hair Care Items by Beauty Without Cruelty: This company is vegetarian, natural, and of course, cruelty-free. I received their Rosemary Mint Tea Tree Conditioner, which is exactly what I wanted. I always seem to get samples of shampoo, but rarely any conditioner. This one is clarifying, yet moisturizing, and adds body to my fine hair. I think I could get away with using it without shampoo.
Happy Mother's Day! Hope you are having a good one. I sure am.
My hubby and kids presented me with these lovely flowers, along with some sexy heels I had been wanting and my favorite Endangered Species Chocolate. For a moment, I thought it was Valentine's Day again. It's nice to be loved.
Hayden also gave me a gift she made in her preschool class. I remember the days when Jacob would do the same. I can't believe Hayden is old enough now to be creating something special for me without my help (although I'm sure her teacher did some of it; thank you Ms. Penny). I just love the adorable way this work of art incorporates her tiny little fingerprints. There's no doubt they are hers.
As usual, I crafted some gifts for my mom (Nana) and grandmother (Granny). In a past post, I asked for advice, while making a piece of jewelry for my mom (her most requested gift from me). Here is the finished bracelet, using both the chain and the pink ribbon to jazz it up a bit. Thank you Jocelyn for your input. I think she'll really like it, along with some J.R. Watkins products I got her (her family is from Minnesota, near the J.R. Watkins company) and nail care stuff.
Also from that past post, Hayden and I decided to give Granny the flower we made as part of our latest Eco Emi DIY.She's the one that taught me to upcycle. Can you believe she's been savingodds and ends others perceive as trash for years and transforming them into new treasures? I wrote a note to her (she is a huge fan of handwritten notes) about how much I appreciate her teaching us this concept and showing everyone how to see the beauty in all things.
I actually got to see Granny at my cousin Holly's baby shower yesterday. Here she is checking out some photos with my mom (her daughter). I thought it was a sweet moment worth sharing.
They may have been looking at a photo of my mom with me and my sisters (Lori and April). It was nice to get a pic of all of us together.
I'll be seeing Lori and my mom at Sunday dinner tonight (April, you will be missed). I'm anxious to have some of the kale salad my mom tossed together before bed last night (so it could marinate and she wouldn't have to make it on Mother's Day). I had sent her this yummy Tone It Up recipe for her to try, but she decided to go more tropical and make one with mango. Yum!
Some of you may be looking forward to Cinco de Mayo tomorrow, but my kids are more excited about the 4th of May, also known as Star Wars Day. May the 4th be with you. Get it? "Fourth" sounds like "force." Anyway, I thought it would be fun to link to another blast from the past post, in case you are celebrating, too. These Rawdorable Star Wars cupcakes have been a big hit in my house, and I hope they will be in yours, as well.May the 4th be with you!
My last post was an Eco Emi unboxing, so it's no surprise that today is my usual follow-up DIY post (here's my last Eco Emi DIY post with links to the others, as well). I had planned on making it a Mother's Day gift-themed project, but based on the color scheme and sparkling gold paper confetti shreds, I knew I had to include Hayden in this one. It just had her written all over it. Hayden obviously thought the same thing as she climbed onto the table and dug into our materials from this month's box. Look at her ready to make a masterpiece of her own. She's such a good little helper, who loves to craft like her mama.
Here's what we had to work with this time: those pale yellow and sparkling gold paper confetti shreds I already mentioned, a pastel pink silky fabric pouch, light green tissue paper and a gift box tied shut with a piece of elastic string.
Hayden couldn't wait to do something with those sparkling gold paper confetti shreds, so we started with a DIY for her. All we needed were the shreds and the piece of elastic string.
We tied the elastic string to create a hair tie. Then, we cut off the excess, saving the rest of the elastic string for future projects (maybe a beaded charm bracelet for Hayden).
Next, we gathered groups of three shreds (two pale yellow and one gold per group of three).
We folded the first group of three paper confetti shreds in half and looped it onto the hair tie.
We continued to attach more groups of three shreds until about half of the hair tie was covered (okay, so maybe I did the attaching, but Hayden helped count out the groups of three shreds). We didn't cover the whole hair tie, because the other half would be used to wrap around Hayden's ponytail a second time when worn, as you'll see at the end of this post.
Once Hayden was happy with her project, we moved on to something you can make for mom. Hayden keeps reminding me how the April showers bring the May flowers, so we decided to make a flower, using the pastel pink fabric pouch. We started by removing the ribbons, which we saved for another project.
Next, I deconstructed the fabric pouch. Don't worry about all the fraying, as you'll hide it while creating your flower.
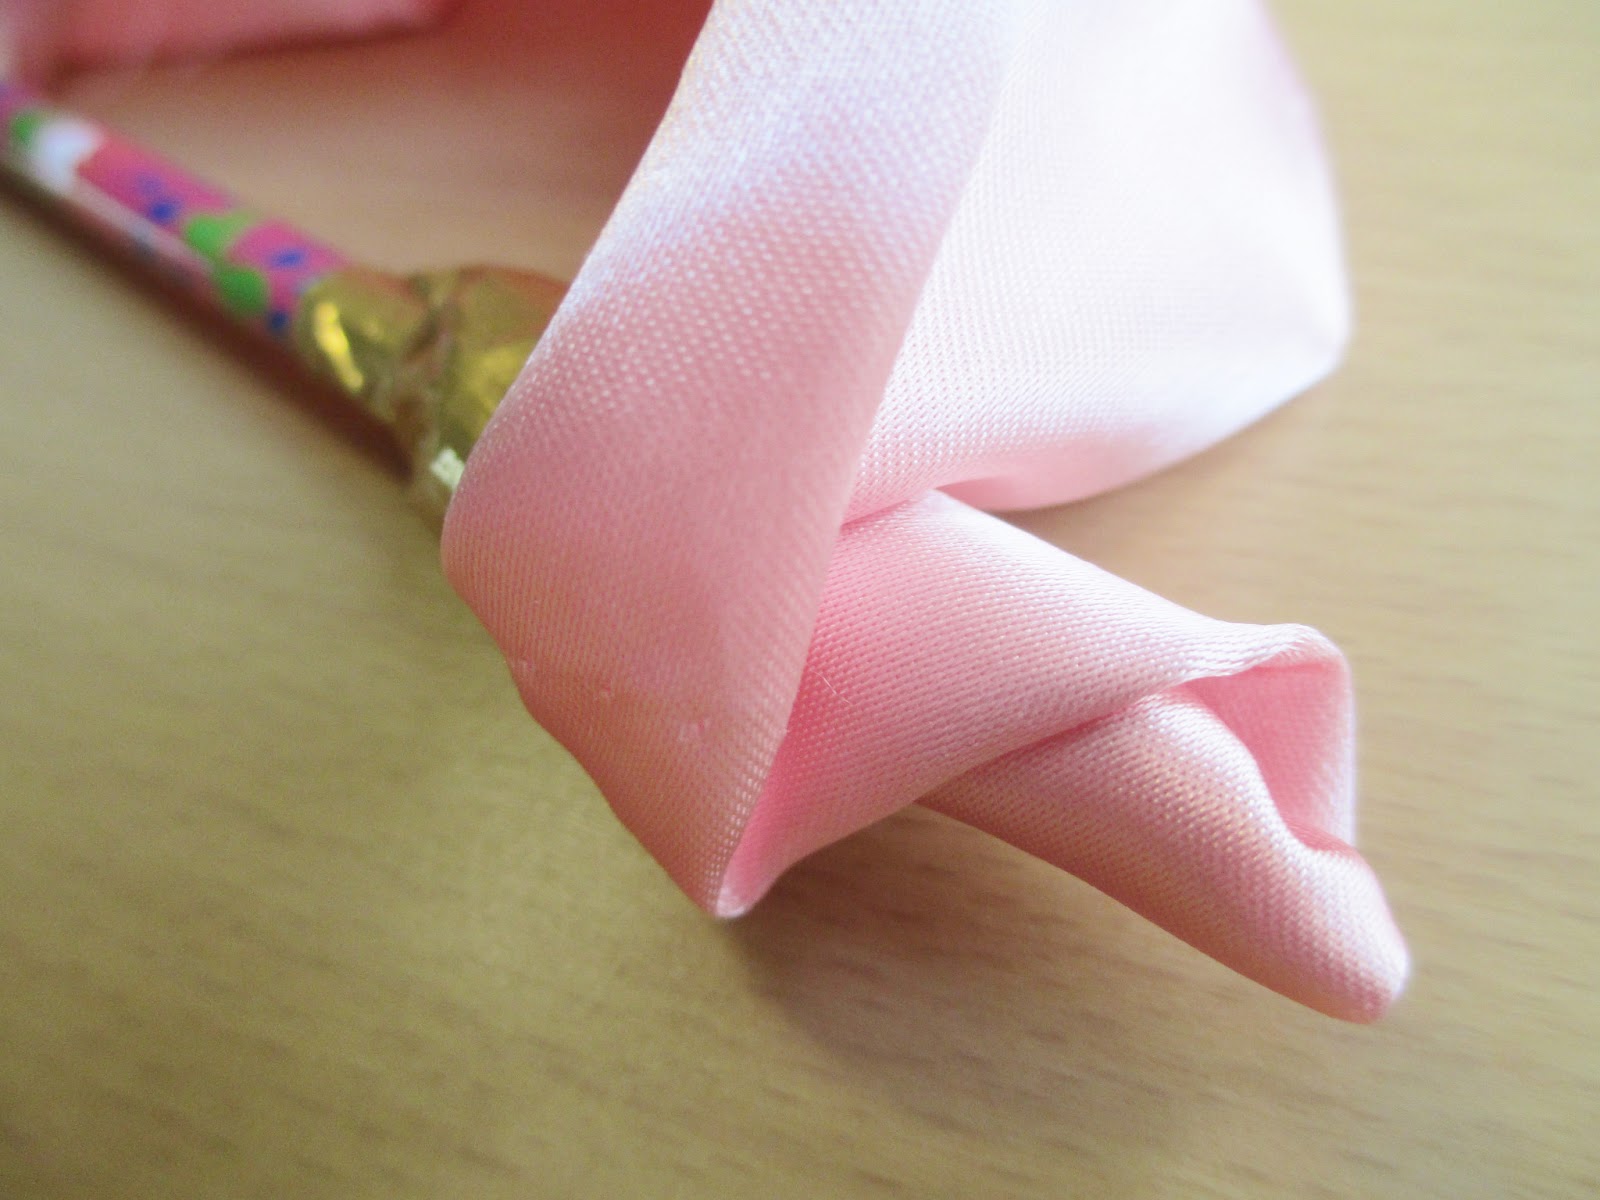
I folded the fabric lengthwise in thirds to help hide the fraying and to make it the perfect size for forming a flower. I opted to use some gold duck tape (I always have decorative duck tape on hand) to attach it to a pencil "stem" (I used a pencil that was missing an eraser, since it would be hidden anyway).
This is when it gets a little difficult to follow and explain. I just kept folding, taping and shaping the fabric until I created a flower. Here are some step-by-step pics to give you a better idea of what I did:
Once the fabric flower was finished, I decided to add some tissue paper leaves. I folded a square of light green tissue paper in half diagonally to make a triangle. I, then, formed the triangle into three leaves and attached them to the base of the flower with more duck tape.
I also added some sparkling gold confetti shreds to the base of the flower for fun. Hayden thought it looked pretty. Here she is holding the finished flower, while wearing the hair tie, too.
Ha ha. She even pretended to smell it :-)
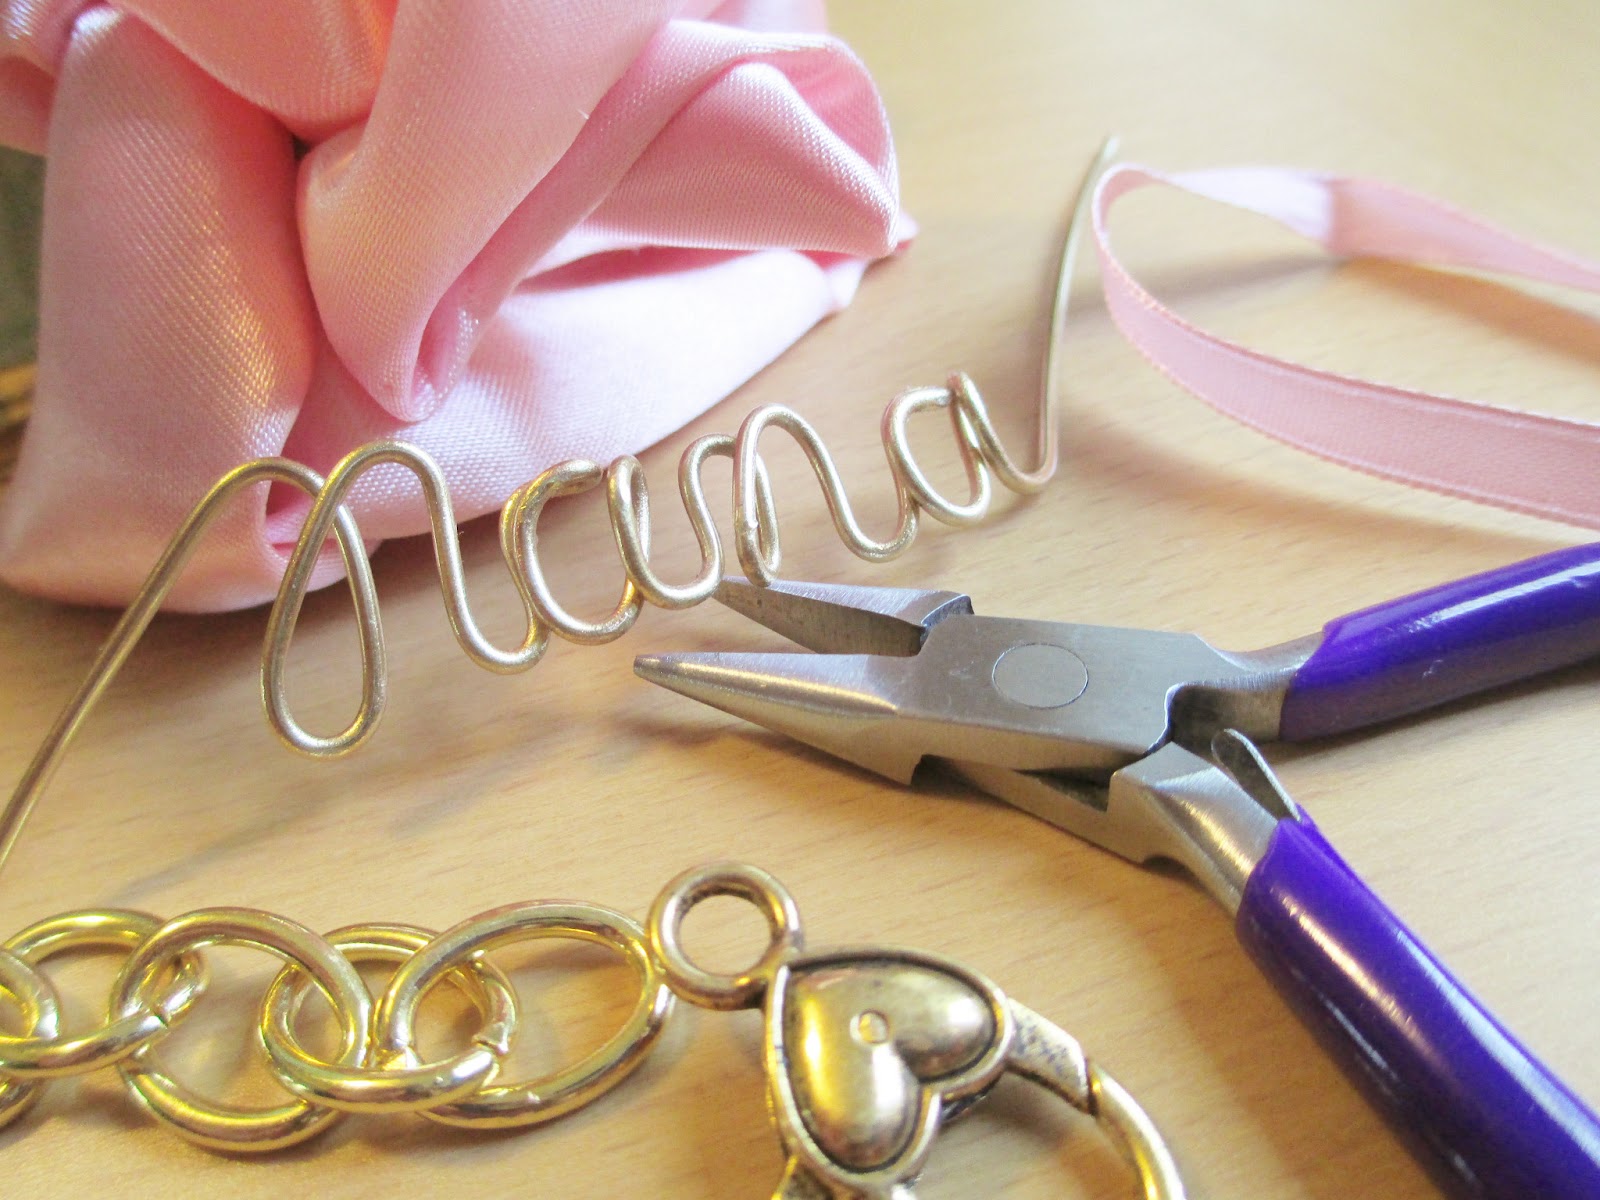
As for the gift box, I still plan on using it for Mother's Day and I encourage you to do the same. Handmade gifts make the best Mother's Day presents, in my opinion. For example, my mom tends to hint for handmade jewelry, so of course, I have a piece in the works for her right now to give to her in the box (hopefully she's not reading this). I used gold wire to spell out "Nana" (that's what the kids call her). I would do the same thing with paper clips to create personalized jewelry in my youth, but I thought this was nicer. I just need to decide if it's going to be a necklace or a bracelet, and if I want to use the links from this past project or the pink ribbon from today's DIY. What do you think?
Thanks in advance for any suggestions left in the comment section. Have a wonderful weekend!