You can use it for a craft. As you know, I always do a follow up DIY project with the packing material found in my Eco Emi boxes. If you missed the past ones, here's January, February, March, April, May, June, July, August, my first September Eco Emi DIY, my second September Eco Emi DIY, my first for October, my second for October, November and December of 2012, as well as January, February, March, April, my first Eco Emi DIY for May, my second for May, and June of 2013.
Today's Eco Emi DIY project was inspired by the scrap of burlap fabric used as decorative wrapping inside of this month's box. I decided to use the actual box as a frame around the burlap, which is perfect for hanging jewelry. I designed the jewelry frame with other materials found inside the box, as shown (brown paper shreds, a thicker green paper shred, a sheer green fabric pouch and a coupon card from Eartha Essentials), and some duck tape I had on hand. Here's how I did it:
To start, I deconstructed the cardboard box and cut out the two large rectangles.
Then, I used a pencil to draw the inside of my frame, using a leftover cardboard strip to create straight lines.
I cut out the inside of the frame from the first cardboard rectangle and repeated the steps on the second cardboard rectangle, making sure both were the same size.
Next, I decided to wrap some of the brown paper shreds around one of the cardboard frames for interest. I grouped two to four of the shreds together at a time, taping them to the back of the frame ...
... and wrapping them around, as you can see.
This is what it looked like almost finished from the back ...
... as well as from the front. I only did the top and bottom, but you could use this technique on your entire frame, if you'd like.
At this point, I still wasn't sure exactly how I wanted the front of my jewelry frame to look, so I moved on to the back of the frame. I opted to cover the back of the second cardboard frame with black duck tape.
After covering the back of the frame with black duck tape, I continued the theme on the sides of the front cardboard frame. I also cut the thick green paper shred into four equal pieces to add a little pop of color to the project. I taped them onto the frame in the same fashion as I did with the brown paper shreds.
I wanted the burlap to be secured between the front and back cardboard frames. To do this, I first cut the burlap to fit, and then taped it in place on the back cardboard frame.
I set the front cardboard frame on top and taped it into place with the same black duck tape. Here's a view of how I applied the duck tape to the front frame ...
... and wrapped it around to the back. I did this to both sides, intentionally leaving the bottom flap of tape out, as shown, for attaching the stand.
To make the stand, I cut two equal-sized strips of cardboard from what was left of the box.
I covered both cardboard strips in black duck tape to match the frame.
I used the two flaps of tape left at the bottom of the frame to attach one end of each of the tape-covered cardboard strips to the frame.
Then, I used more tape to connect the top of the strips to the frame, as shown.
The jewelry frame was basically complete at this point, but I decided to give it a bit more function and detail by adding the sheer green fabric pouch to the front (it works well for storing bracelets and such, so they can be seen), along with part of that Eartha Essentials coupon card (I cut out the word "Essentials," as this jewelry frame was the perfect place for displaying some of my accessory "essentials").
Here's the finished jewelry frame, with examples of how you can display accessories on it. Let me know if you make one, too :-)
Monday, July 29, 2013
Thursday, July 25, 2013
"Endless Summer Spa"
That's the theme for this month's Eco Emi box. Hayden and I just got ours yesterday, after a fun day of shopping. We couldn't wait to do an unboxing video, so we could test out all the products inside.
If you didn't see our video when we uploaded it last night, you can watch it here and/or read our thoughts about what we received below.
As I already mentioned, July's theme is "Endless Summer Spa," so the box was packed with products for creating your own spa day or evening at home (I opted to try most of them last night). Although I have simplified my daily facial care routine to just an oil cleanser and some pure argan oil, I do still enjoy the occasional spa experience, using the products I've received.
Rose Cleansing Scrub by French Girl Organics: This is my favorite product from this month's box. The pale pink rose cleansing grains are beautifully contained in a pretty glass bottle that I plan on keeping to use as a tiny flower vase (Hayden is always picking small wild flowers, like buttercups, which would look so cute in this). Last night, I removed my makeup with some argan oil and then exfoliated my delicate skin with with this lovely combination of finely ground rose petals, rose hip powder, brown rice powder, hibiscus powder, white & pink clay, and a variety of essential oils. I just poured a tiny bit of the powder in the palm of my hand, mixed it with a few drops of water and applied it to my face. The sweet hibiscus fragrance was heavenly, and although it contained flowers and exfoliating grains, it didn't irritate my extremely sensitive skin. The product rinsed off easily and left my skin feeling soft as a baby's bottom. I highly recommend this one.
Stress Relief Bath Soak by Eartha Essentials: This product also came in a tiny bottle, perfect for reusing as a flower vase. I didn't get an opportunity to try it yet, but I hope to use it in a relaxing bath asap. I love that the ingredient list is short and sweet, only containing distilled water, organic castile soap, organic vegetable glycerin, organic almond oil, lavender and ylang ylang essential oils. It also has a light, calming scent. The lavender seems to be the star in the one I received.
Lushful Lips Scrub by Eartha Essentials: Ha ha. I checked my e-mail after we did our unboxing video and found a "spoiler alert" message from an Eco Emi representative warning that the heat may have melted this product. I had already discovered that fact during the video when I opened mine. Thank goodness it didn't spill all over the place. The butters and beeswax had liquified, but the raw sugar grains maintained their grit. After spending some time in my fridge, the lip scrub solidified, but with some separation. Most of the scrub ended up at the bottom, while a very nice lip butter found its way to the top. I guess I'll have to wait to sample the scrub component; however, I am currently enjoying the moisturizing part. It smells like lemon and coconut, due to it's short list of natural ingredients: organic mango butter, organic coconut oil, beeswax, organic raw cane sugar and organic lemon essential oil.
Amend Facial Solar Repair Anti-Aging Serum by Blissoma: In our video, I referred to this serum as liquid gold, solely based on its golden hue, but after testing it out last night, I have to admit that reference goes a bit further. I applied it to my face, following the French Girl Rose Cleansing Scrub and some Blissoma spray toner, and it left my skin feeling soft, smooth and with a natural glow (as opposed to an oily shine). All I needed was a drop, so hopefully, it will last a little while. This stuff is like gold.
Body Spritzer "Tangelo Twist" by Aubrey: Hayden really likes this body spritzer. She thinks it smells like one of her Strawberry Shortcake dolls. It has a light citrus/floral scent. the best part is the fact that it is not tested on animals.
Whipped Cream Body Butter by Fortune Cookie Soap: I'm not sure what to think about this one. At first, it made me think of the cute fortune cookie soaps they sell online, although I've never actually tried them myself. Then, I think I figured out why I hadn't. It has a light green color that didn't look very natural and a scent that made me wonder, as well. The ingredient list isn't as stellar as the other products from this month's box, so I'm still on the fence about this one. I did, however, try it on my hands during our video. It is very moisturizing.
Cucumber Mint Green Tea by Tea Forte: When I first removed this tea bag from the box, I thought it was going to be some of those fake cucumber slices for your eyes, but quickly figured out it was tea. Did you know you can use chilled tea bags on your eyes to reduce puffiness? After I steep my tea, I'll have to use this tea bag for that.
Sleep Mask by Limitless Skies: I forgot to mention in our video that this sleep mask is made by Limitless Skies. It reminded me of the one I made for Hayden out of items from a past Eco Emi box. I wonder what we should make this time. I guess you'll have to wait to find out.
Have a lovely day!
If you didn't see our video when we uploaded it last night, you can watch it here and/or read our thoughts about what we received below.
As I already mentioned, July's theme is "Endless Summer Spa," so the box was packed with products for creating your own spa day or evening at home (I opted to try most of them last night). Although I have simplified my daily facial care routine to just an oil cleanser and some pure argan oil, I do still enjoy the occasional spa experience, using the products I've received.
Rose Cleansing Scrub by French Girl Organics: This is my favorite product from this month's box. The pale pink rose cleansing grains are beautifully contained in a pretty glass bottle that I plan on keeping to use as a tiny flower vase (Hayden is always picking small wild flowers, like buttercups, which would look so cute in this). Last night, I removed my makeup with some argan oil and then exfoliated my delicate skin with with this lovely combination of finely ground rose petals, rose hip powder, brown rice powder, hibiscus powder, white & pink clay, and a variety of essential oils. I just poured a tiny bit of the powder in the palm of my hand, mixed it with a few drops of water and applied it to my face. The sweet hibiscus fragrance was heavenly, and although it contained flowers and exfoliating grains, it didn't irritate my extremely sensitive skin. The product rinsed off easily and left my skin feeling soft as a baby's bottom. I highly recommend this one.
Stress Relief Bath Soak by Eartha Essentials: This product also came in a tiny bottle, perfect for reusing as a flower vase. I didn't get an opportunity to try it yet, but I hope to use it in a relaxing bath asap. I love that the ingredient list is short and sweet, only containing distilled water, organic castile soap, organic vegetable glycerin, organic almond oil, lavender and ylang ylang essential oils. It also has a light, calming scent. The lavender seems to be the star in the one I received.
Lushful Lips Scrub by Eartha Essentials: Ha ha. I checked my e-mail after we did our unboxing video and found a "spoiler alert" message from an Eco Emi representative warning that the heat may have melted this product. I had already discovered that fact during the video when I opened mine. Thank goodness it didn't spill all over the place. The butters and beeswax had liquified, but the raw sugar grains maintained their grit. After spending some time in my fridge, the lip scrub solidified, but with some separation. Most of the scrub ended up at the bottom, while a very nice lip butter found its way to the top. I guess I'll have to wait to sample the scrub component; however, I am currently enjoying the moisturizing part. It smells like lemon and coconut, due to it's short list of natural ingredients: organic mango butter, organic coconut oil, beeswax, organic raw cane sugar and organic lemon essential oil.
Amend Facial Solar Repair Anti-Aging Serum by Blissoma: In our video, I referred to this serum as liquid gold, solely based on its golden hue, but after testing it out last night, I have to admit that reference goes a bit further. I applied it to my face, following the French Girl Rose Cleansing Scrub and some Blissoma spray toner, and it left my skin feeling soft, smooth and with a natural glow (as opposed to an oily shine). All I needed was a drop, so hopefully, it will last a little while. This stuff is like gold.
Body Spritzer "Tangelo Twist" by Aubrey: Hayden really likes this body spritzer. She thinks it smells like one of her Strawberry Shortcake dolls. It has a light citrus/floral scent. the best part is the fact that it is not tested on animals.
Whipped Cream Body Butter by Fortune Cookie Soap: I'm not sure what to think about this one. At first, it made me think of the cute fortune cookie soaps they sell online, although I've never actually tried them myself. Then, I think I figured out why I hadn't. It has a light green color that didn't look very natural and a scent that made me wonder, as well. The ingredient list isn't as stellar as the other products from this month's box, so I'm still on the fence about this one. I did, however, try it on my hands during our video. It is very moisturizing.
Cucumber Mint Green Tea by Tea Forte: When I first removed this tea bag from the box, I thought it was going to be some of those fake cucumber slices for your eyes, but quickly figured out it was tea. Did you know you can use chilled tea bags on your eyes to reduce puffiness? After I steep my tea, I'll have to use this tea bag for that.
Sleep Mask by Limitless Skies: I forgot to mention in our video that this sleep mask is made by Limitless Skies. It reminded me of the one I made for Hayden out of items from a past Eco Emi box. I wonder what we should make this time. I guess you'll have to wait to find out.
Have a lovely day!
Monday, June 24, 2013
Dressed for the occasion
The Fourth of July isn't here quite yet, but Hayden is already dressed for the occasion. I just couldn't resist transforming this patriotic bandana (from our latest Eco Emi box) into a festive dress for the upcoming holiday or any other fun summer day. Although it came with a card showing multiple ways to wear and display the stars and stripes fabric square (I featured the hairstyle side of the card in my last post), I was inspired to create one of my own design.
The dress you see Hayden proudly modeling is actually a combination between this bandana apron idea and double-bandana girl's dress. I had considered making the apron for myself, but opted instead to sew something special for Hayden. Since I only had one bandana (I was so close to asking my sister for hers), I altered the original apron design to turn it into a child's size dress. Here's how I did it:
First, I searched my house for a thick ribbon or something to act as a tie. I found this white cloth ribbon that had been wrapped around a stack of wash cloths I had purchased quite some time ago. It was the perfect match.
I folded one corner of the fabric down, across the cloth ribbon, and pinned it to form the neckline. Then, I sewed it in place.
Here's what it looked like, as I planned the next steps.
I tied the fabric inside-out onto Hayden at the neckline and pinned the back seam. I sewed it and tried it on Hayden again to make sure it fit properly.
I felt it necessary to add some fabric to the bottom back of the dress, basically to cover her bottom when she runs around/bends over in it. Without hesitation (or ironing, as I was doing this project on a whim and right before a storm was about to take my good light away), I cut off the bottom triangle from the front of the dress ...
... pinned it to the back and sewed it along the original stitching.
I, then, gave the dress a new hem (yes, I know I still hadn't ironed it; if you have the time, make sure you iron yours).
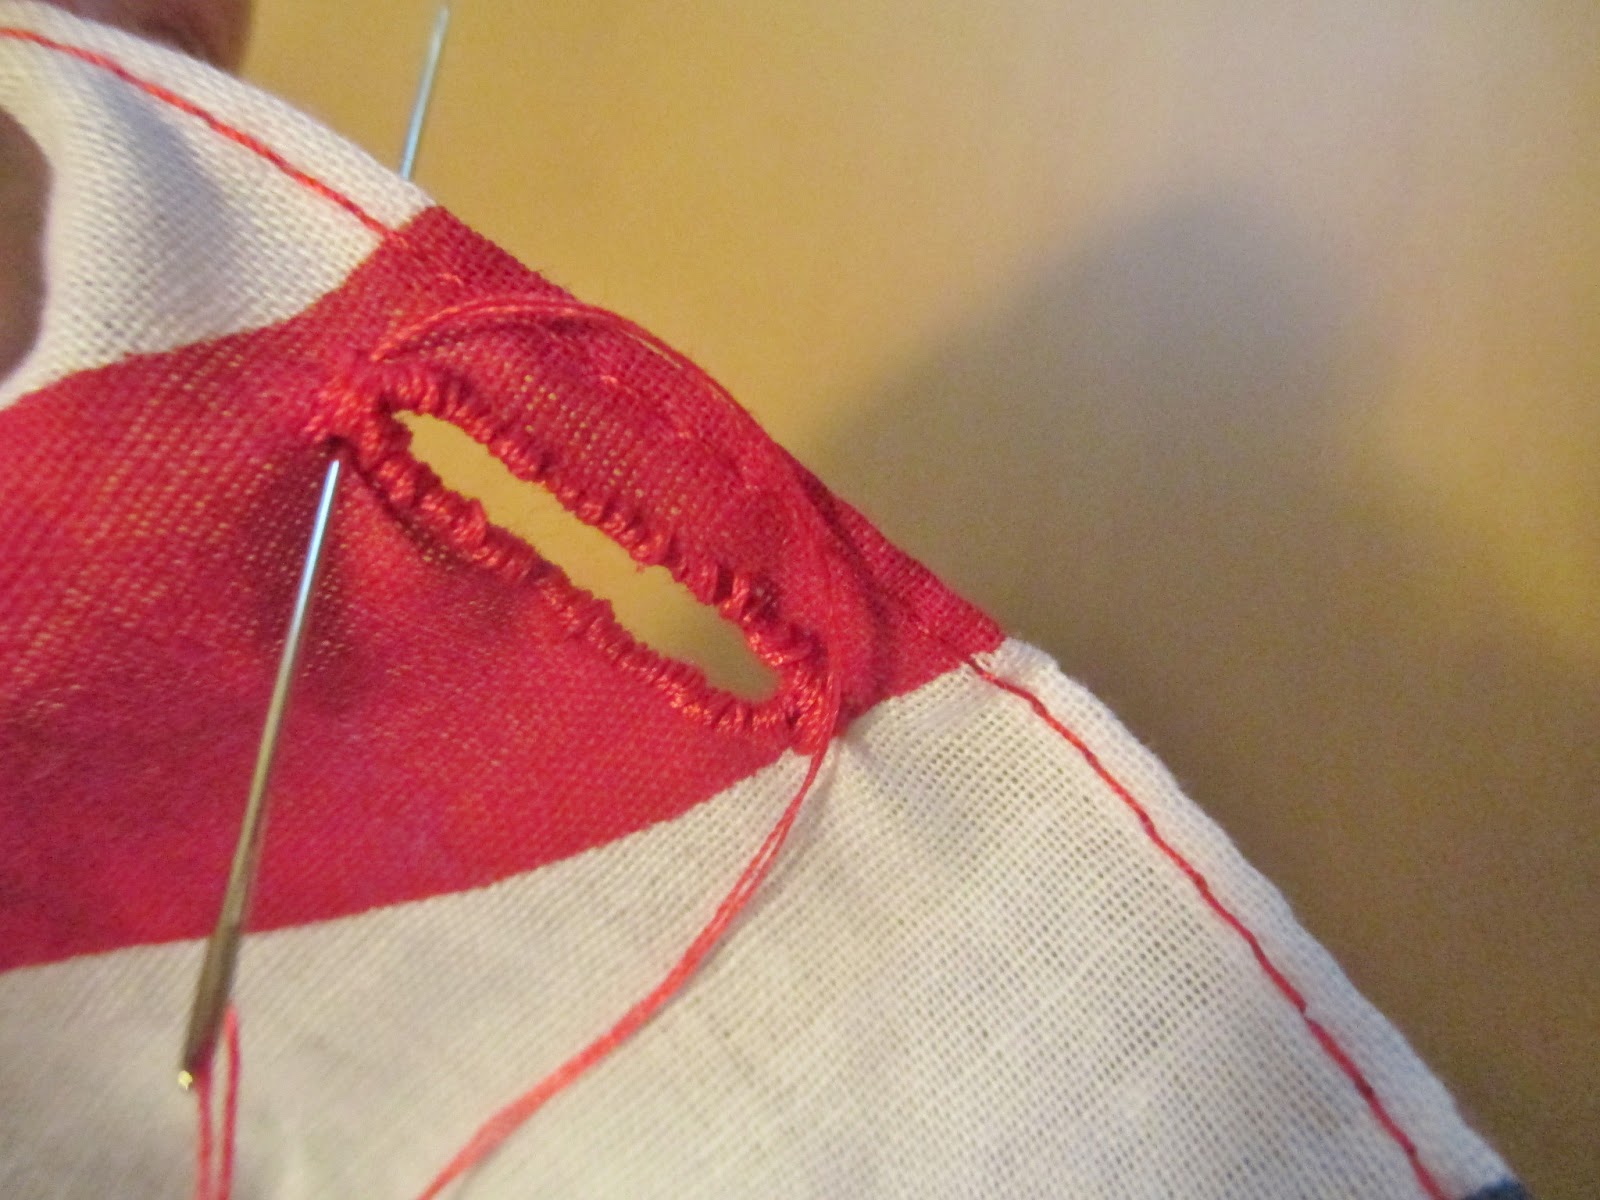
Lastly, I decided to add even more interest to the dress by sewing a button hole (my sewing machine was acting up, so I quickly stitched them by hand) on each side of the back of the dress. The plan was to thread the extra neck tie length through them to create a crisscross back.
You can see the results in Hayden's photo shoot (obviously, she's happy with the dress; we took a lot of photos).
First, I searched my house for a thick ribbon or something to act as a tie. I found this white cloth ribbon that had been wrapped around a stack of wash cloths I had purchased quite some time ago. It was the perfect match.
I folded one corner of the fabric down, across the cloth ribbon, and pinned it to form the neckline. Then, I sewed it in place.
Here's what it looked like, as I planned the next steps.
I tied the fabric inside-out onto Hayden at the neckline and pinned the back seam. I sewed it and tried it on Hayden again to make sure it fit properly.
I felt it necessary to add some fabric to the bottom back of the dress, basically to cover her bottom when she runs around/bends over in it. Without hesitation (or ironing, as I was doing this project on a whim and right before a storm was about to take my good light away), I cut off the bottom triangle from the front of the dress ...
... pinned it to the back and sewed it along the original stitching.
I, then, gave the dress a new hem (yes, I know I still hadn't ironed it; if you have the time, make sure you iron yours).
Lastly, I decided to add even more interest to the dress by sewing a button hole (my sewing machine was acting up, so I quickly stitched them by hand) on each side of the back of the dress. The plan was to thread the extra neck tie length through them to create a crisscross back.
You can see the results in Hayden's photo shoot (obviously, she's happy with the dress; we took a lot of photos).
What do you think? What would you make with this bandana?
Friday, June 21, 2013
Happy Summer
Today is the official first day of summer, as well as time to unbox our June Eco Emi. The card in the box greeted us with "happy summer" and explained a little about all the products we'd find inside. There was even a patriotic bandana in honor of the Fourth of July, along with some ideas for wearing it and other fun uses. Hayden and I'll have to incorporate it into our next DIY, like the one we made last month.
As for the rest of the box contents, you can watch our reactions in the video above and/or read them belong:
Cuticle Care with Soothing Shea Butter by Badger: I've been buying Badger Balms for years. The tins are great for popping in your purse for whenever you might need a bit of moisture. The basic balms can be used for so many things (I've been known to rub a little into the ends of my hair when it looks a bit parched), but some of them are formulated for specific needs. My favorites are the After Sun Balm, Baby Balm, Sleep Balm and the Aromatic Chest Rub.
Coconut Hand and Body Lotion by Desert Essence: This is yet another company I've been purchasing from for years. I like their shampoos and conditioners, as well as their face products. When my skin broke out more, I would use their face wash, tea tree oil facial cleansing pads and blemish touch stick (actually, I still use that one). I'm amazed that I haven't tried this lotion. I love coconut, so I'm sure it will be a hit.
Vegan Lip and Cheeks in Peachy Rose by The All Natural Face: I've been loving every All Natural Face product featured in my Eco Emi boxes so far, and this one was no exception. This very natural looking lip and cheek cream is perfect for my complexion (it has argan oil in it) and is excellent for touch ups on the go. It comes in a tiny mirror compact, which is small enough to fit in Hayden's pocket. All I need is this and some mascara to create a carefree summer look.
Vegan Bronzer by Purely You Minerals: Okay, maybe a little bronzer would be nice, too, although I tend to just sport my own natural glow. This one just leaves a subtle glow and blends well with my skin. It might be nice for days when I'm lacking in the sleep department.
Purifying Cleansing Wipes by Nelsons Pure & Clear: Thank goodness my skin is outgrowing the acne face, but unfortunately, my son is just entering it. I guess these wipes came at the perfect time. Boys don't tend to be big fans of facial regimens, so these wipes have his name written all over them. He tested them out last night and this morning. All he had to do was swipe them over his face (no water was needed). He likes the feel of them on his skin, but doesn't care much for the smell (they contain tea tree oil and witch hazel). I know it has only been two uses, but his skin looks great. I might have to buy some more of these.
Chipotle BBQ Chips by Beanitos Black Bean Chips: We've had Beanitos before and ate them all up. I have a feeling these will disappear soon, too. Since I don't offer prepackaged snacks in the house very often, these will have to wait to our next outing.
All-Natural, Gluten-free Gummy Bears by Surf Sweets: Hayden got especially excited about these, and although I was hesitant to give them to her, she tore open the package before I even got a picture. Heads up that they are not vegan. She ate them anyway and loved them. Obviously, I'm not that strict about it.
Wheatgrass Organic Heirloom Seeds by Botanical Interests: Somehow I did not get my mom's green thumb. I meant to grow wheatgrass in the past, but it never happened. I think the universe wants to change that. If it works, I'll need to get the proper juicer for it (I actually enjoy wheatgrass juice) or just use it for decoration (it looks great on a spring table, especially at Easter time).
That's all for now folks. Have a lovely weekend!
As for the rest of the box contents, you can watch our reactions in the video above and/or read them belong:
Cuticle Care with Soothing Shea Butter by Badger: I've been buying Badger Balms for years. The tins are great for popping in your purse for whenever you might need a bit of moisture. The basic balms can be used for so many things (I've been known to rub a little into the ends of my hair when it looks a bit parched), but some of them are formulated for specific needs. My favorites are the After Sun Balm, Baby Balm, Sleep Balm and the Aromatic Chest Rub.
Coconut Hand and Body Lotion by Desert Essence: This is yet another company I've been purchasing from for years. I like their shampoos and conditioners, as well as their face products. When my skin broke out more, I would use their face wash, tea tree oil facial cleansing pads and blemish touch stick (actually, I still use that one). I'm amazed that I haven't tried this lotion. I love coconut, so I'm sure it will be a hit.
Vegan Lip and Cheeks in Peachy Rose by The All Natural Face: I've been loving every All Natural Face product featured in my Eco Emi boxes so far, and this one was no exception. This very natural looking lip and cheek cream is perfect for my complexion (it has argan oil in it) and is excellent for touch ups on the go. It comes in a tiny mirror compact, which is small enough to fit in Hayden's pocket. All I need is this and some mascara to create a carefree summer look.
Vegan Bronzer by Purely You Minerals: Okay, maybe a little bronzer would be nice, too, although I tend to just sport my own natural glow. This one just leaves a subtle glow and blends well with my skin. It might be nice for days when I'm lacking in the sleep department.
Purifying Cleansing Wipes by Nelsons Pure & Clear: Thank goodness my skin is outgrowing the acne face, but unfortunately, my son is just entering it. I guess these wipes came at the perfect time. Boys don't tend to be big fans of facial regimens, so these wipes have his name written all over them. He tested them out last night and this morning. All he had to do was swipe them over his face (no water was needed). He likes the feel of them on his skin, but doesn't care much for the smell (they contain tea tree oil and witch hazel). I know it has only been two uses, but his skin looks great. I might have to buy some more of these.
Chipotle BBQ Chips by Beanitos Black Bean Chips: We've had Beanitos before and ate them all up. I have a feeling these will disappear soon, too. Since I don't offer prepackaged snacks in the house very often, these will have to wait to our next outing.
All-Natural, Gluten-free Gummy Bears by Surf Sweets: Hayden got especially excited about these, and although I was hesitant to give them to her, she tore open the package before I even got a picture. Heads up that they are not vegan. She ate them anyway and loved them. Obviously, I'm not that strict about it.
Wheatgrass Organic Heirloom Seeds by Botanical Interests: Somehow I did not get my mom's green thumb. I meant to grow wheatgrass in the past, but it never happened. I think the universe wants to change that. If it works, I'll need to get the proper juicer for it (I actually enjoy wheatgrass juice) or just use it for decoration (it looks great on a spring table, especially at Easter time).
That's all for now folks. Have a lovely weekend!
Wednesday, June 19, 2013
Happy birthday to my better half
No, I'm not talking about Hayden, although we do make a good pair. I'm referring to my husband Matthew, whose birthday is today. As he'd prefer to spend time with me, rather than me taking a while to post a lengthy post in is honor, I'm going to make this short and sweet.
My hubby and I have a lot in common, as well as our differences. Thank goodness opposites attract like in this "unbaked" version of Ben & Jerry's Half Baked ice cream. Although Matthew and I went to an actual Ben & Jerry's as one of our first dates, he is the only one of the two of us who still consumes the real deal. Therefore, I picked up some Chocolate Fudge Brownie for him and Jacob, and quickly whipped together a banana n'ice cream in this "indecisive flavor" (I can never make up my mind) for both Hayden and myself.
It's not my birthday, so I wasn't about to dedicate a ton of time to my dessert. I simply whipped up the usual banana n'ice cream base (frozen banana chunks, whipped into a creamy frozen dessert in a food processor, of course), removed half and mixed in some chunks of Chocolate Chip Cookie Dough Larabar. Then, I added cocoa powder to the rest of the plain banana n'ice cream, gave it another spin in my old school food processor and stirred in some broken up Black Swan Chocolate Berry Barre "brownie bites." Both flavors were served up as shown. Yummy!
Those Black Swan Barres are a fave of my tiny ballerina, who had her first recital last weekend (it was a hectic week, including a tech rehearsal, dress rehearsal and two recitals). We are so proud of our little performer. She did all the steps, despite the fact that the girl next to her ran off the stage. She's even asking to perform again soon.
Here are some photos from after the show:
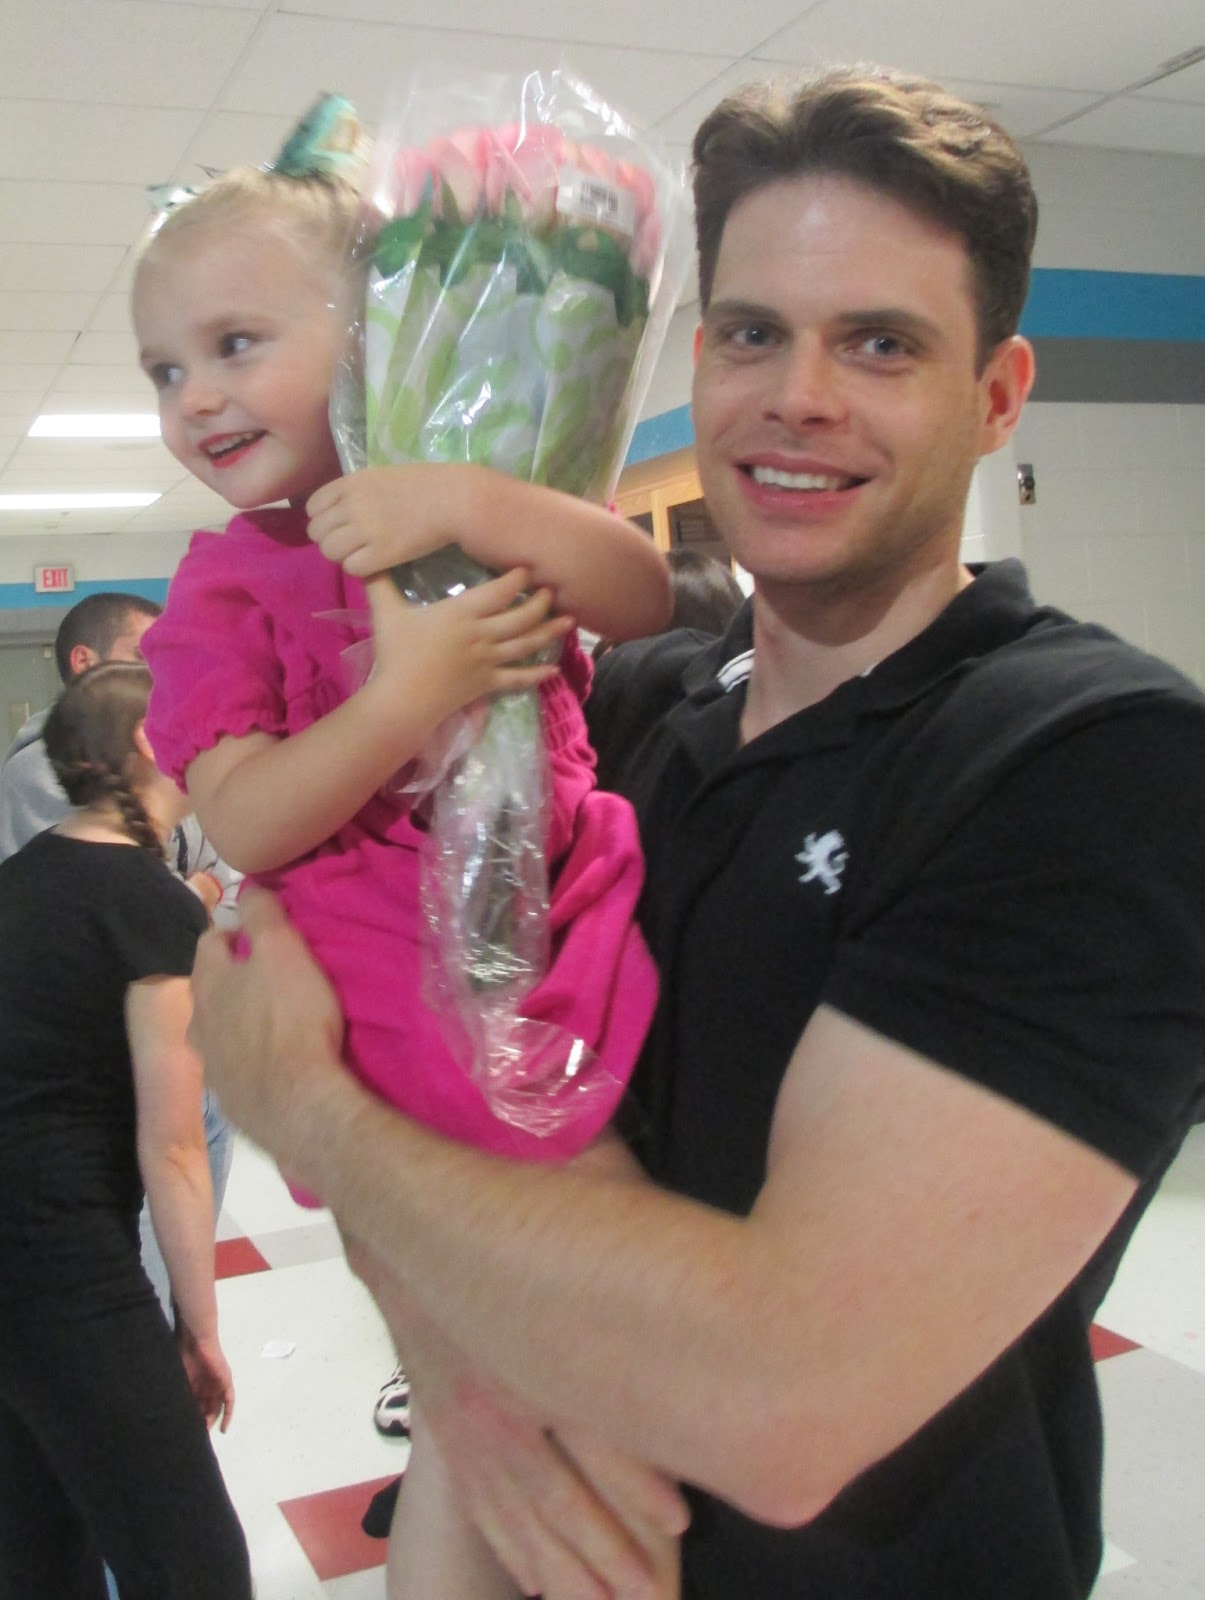
Hayden was all smiles with her daddy, a.k.a. the birthday boy (recognize the pink roses from the photo at the beginning of this post? Oh, and the pink happy birthday candle was actually from Hayden's first b-day).
Obviously, I'm proud of my girl (I think I cried off all of my eye makeup) ...
... and she was proud of her Aunt April, who taught some of the other classes there. It was her last year teaching for now, as she wants to focus more of her time on performing in a dance company.
Anyway, my hubby is requesting some more of my time right now. TTFN!
My hubby and I have a lot in common, as well as our differences. Thank goodness opposites attract like in this "unbaked" version of Ben & Jerry's Half Baked ice cream. Although Matthew and I went to an actual Ben & Jerry's as one of our first dates, he is the only one of the two of us who still consumes the real deal. Therefore, I picked up some Chocolate Fudge Brownie for him and Jacob, and quickly whipped together a banana n'ice cream in this "indecisive flavor" (I can never make up my mind) for both Hayden and myself.
It's not my birthday, so I wasn't about to dedicate a ton of time to my dessert. I simply whipped up the usual banana n'ice cream base (frozen banana chunks, whipped into a creamy frozen dessert in a food processor, of course), removed half and mixed in some chunks of Chocolate Chip Cookie Dough Larabar. Then, I added cocoa powder to the rest of the plain banana n'ice cream, gave it another spin in my old school food processor and stirred in some broken up Black Swan Chocolate Berry Barre "brownie bites." Both flavors were served up as shown. Yummy!
Those Black Swan Barres are a fave of my tiny ballerina, who had her first recital last weekend (it was a hectic week, including a tech rehearsal, dress rehearsal and two recitals). We are so proud of our little performer. She did all the steps, despite the fact that the girl next to her ran off the stage. She's even asking to perform again soon.
Here are some photos from after the show:
Hayden was all smiles with her daddy, a.k.a. the birthday boy (recognize the pink roses from the photo at the beginning of this post? Oh, and the pink happy birthday candle was actually from Hayden's first b-day).
Obviously, I'm proud of my girl (I think I cried off all of my eye makeup) ...
... and she was proud of her Aunt April, who taught some of the other classes there. It was her last year teaching for now, as she wants to focus more of her time on performing in a dance company.
Anyway, my hubby is requesting some more of my time right now. TTFN!
Wednesday, May 29, 2013
Have you met Vera?
Sorry I've taken so long to post my second of two Eco Emi DIYs I planned to post this month. The first was a personal pinata perfect for your next summer celebration, although I haven't felt much like celebrating. While many Americans were busy hanging out at their traditional Memorial Day cookouts, my family spent the day in mourning.
I nearly didn't post this DIY, until a memory of my hubby's late uncle (he passed away suddenly Monday) brought a smile back to my face. You see, he was quite the comedian, always having fun with my willingness to believe whatever he said.
For example, he purchased my first Vera Bradley bag and many more after that one (he would usually give one to me for Christmas and my birthday). When an official Vera Bradley store opened nearby, he tried to convince me that he met "Vera Bradley" herself. I, of course, believed him, until I my "Googling" skills revealed she didn't actually exist. I still laugh about his little trick every time I see a Vera Bradley bag or print.
So, I reconsidered posting today's DIY when the Vera-like print just seemed like a sign for me go through with it as planned, as well as to share his memory with you. Here's how to make a coin purse/ID holder, using the printed fabric and clear plastic case from this month's Eco Emi, as well as a small zipper, thread and scrap ribbon.
First of all, I must apologize in advance for doing this project "on-the-fly," without any measurements. I basically followed Tim Gunn's advice; in other words, "make it work." For example, my zipper was slightly too long for this project, so I did some wrap stitches at the point I wanted the zipper to stop and cut it to the desired length.
Then, I folded the material in half and marked where I planned to cut the fabric, using my Vera Bradley coin purse as a guide.
After I cut off the excess fabric, I also cut a rectangle out of the plastic case to serve as my ID window. I also reserved the excess piece of fabric to create the pocket behind the window.
I traced my ID onto the inside of the larger piece of fabric where I wanted the window to be. Then, I cut out the inside of the window, leaving a tiny border to frame my ID or other card when placed inside the finished pocket.
Next, I positioned the clear plastic on top of the window and the scrap piece of fabric on top of the plastic, making sure the festive fabric print was showing through the window. Then, I sewed the rectangular pocket together (be careful not to sew the top of the scrap piece, so that you are left with a pocket to slip your ID inside; the best way to do this is to position the top of the scrap fabric slightly lower than the top of the plastic).
Once I created the pocket, I opted to sew on the zipper, starting with the pocket side.
The second side of the zipper was a bit trickier, as I was working with such a small piece of fabric that I had folded in half (rather than cutting two separate pieces for the sides that would be sewn together in the end). I unzipped the zipper and got creative with my sewing machine. I was able to sew most of the length that way ...
... but finished the last stitches by hand.
Before sewing the sides together, I decided to cut a piece of ribbon to transform the coin purse into a wristlet.
I made sure the zipper was unzipped and the fabric was inside out, pinned the ribbon loop in place (it should be inside the unfinished inside-out coin purse at this point) and sewed the sides, as shown.
Then, I flipped the coin purse right-side-out through the unzipped zipper.
I added a small piece of ribbon to the end of the zipper for that extra special finishing touch.
And since I'd prefer not to display it with my actual ID, I slipped this Lauren Brooke offer inside the window. I hope it's okay that I shared this with you. There are always cool offers inside each month's Eco Emi box, much like this one. It's worth checking out (and no, I was not paid to say that).
I nearly didn't post this DIY, until a memory of my hubby's late uncle (he passed away suddenly Monday) brought a smile back to my face. You see, he was quite the comedian, always having fun with my willingness to believe whatever he said.
For example, he purchased my first Vera Bradley bag and many more after that one (he would usually give one to me for Christmas and my birthday). When an official Vera Bradley store opened nearby, he tried to convince me that he met "Vera Bradley" herself. I, of course, believed him, until I my "Googling" skills revealed she didn't actually exist. I still laugh about his little trick every time I see a Vera Bradley bag or print.
So, I reconsidered posting today's DIY when the Vera-like print just seemed like a sign for me go through with it as planned, as well as to share his memory with you. Here's how to make a coin purse/ID holder, using the printed fabric and clear plastic case from this month's Eco Emi, as well as a small zipper, thread and scrap ribbon.
First of all, I must apologize in advance for doing this project "on-the-fly," without any measurements. I basically followed Tim Gunn's advice; in other words, "make it work." For example, my zipper was slightly too long for this project, so I did some wrap stitches at the point I wanted the zipper to stop and cut it to the desired length.
Then, I folded the material in half and marked where I planned to cut the fabric, using my Vera Bradley coin purse as a guide.
After I cut off the excess fabric, I also cut a rectangle out of the plastic case to serve as my ID window. I also reserved the excess piece of fabric to create the pocket behind the window.
I traced my ID onto the inside of the larger piece of fabric where I wanted the window to be. Then, I cut out the inside of the window, leaving a tiny border to frame my ID or other card when placed inside the finished pocket.
Next, I positioned the clear plastic on top of the window and the scrap piece of fabric on top of the plastic, making sure the festive fabric print was showing through the window. Then, I sewed the rectangular pocket together (be careful not to sew the top of the scrap piece, so that you are left with a pocket to slip your ID inside; the best way to do this is to position the top of the scrap fabric slightly lower than the top of the plastic).
Once I created the pocket, I opted to sew on the zipper, starting with the pocket side.
The second side of the zipper was a bit trickier, as I was working with such a small piece of fabric that I had folded in half (rather than cutting two separate pieces for the sides that would be sewn together in the end). I unzipped the zipper and got creative with my sewing machine. I was able to sew most of the length that way ...
... but finished the last stitches by hand.
Before sewing the sides together, I decided to cut a piece of ribbon to transform the coin purse into a wristlet.
I made sure the zipper was unzipped and the fabric was inside out, pinned the ribbon loop in place (it should be inside the unfinished inside-out coin purse at this point) and sewed the sides, as shown.
Then, I flipped the coin purse right-side-out through the unzipped zipper.
I added a small piece of ribbon to the end of the zipper for that extra special finishing touch.
And since I'd prefer not to display it with my actual ID, I slipped this Lauren Brooke offer inside the window. I hope it's okay that I shared this with you. There are always cool offers inside each month's Eco Emi box, much like this one. It's worth checking out (and no, I was not paid to say that).
Subscribe to:
Posts (Atom)